Drums and Computers: Linking Up and Getting Online
Are you ready to start showing off your drumming skills by producing videos or streaming performances, but you have no idea how to record yourself or what kind of gear you need? That’s okay. The options of equipment, software, and methods can quickly get overwhelming. But here are some tips to guide you in the right direction to get your rig internet-ready.
If you’ve been taking online drum lessons with Loudlands Music Lab, you may have thought, “How is my instructor able to achieve such a good drum sound in our online meeting?” There’s no single correct answer to that question, but there are some general steps to take to get your rig “talking” to your computer and the internet.
Streaming Acoustic Drums
Most computers and laptops have a built-in microphone, but those tiny microphones aren’t designed to handle more than a person speaking with an indoor voice, much less something as loud and with as wide a range of frequencies as an acoustic drum set. As soon as the volume gets too loud, the microphone clips, resulting in a harsh, distorted sound. An external microphone is needed to better control the input volume and the quality of the sound.
Blue Yeti Microphone
Using A Single Microphone
Whether you have a full acoustic drum set or just a practice pad, the simplest way to improve the quality of your audio is to place a single condenser microphone in the room. Condenser microphones are very sensitive and are capable of picking up a very wide range of frequencies and dynamics, making them ideal for capturing the sounds of the drums and the human voice. Now, it’s not as easy as plopping a mic in the room and calling it a day. You’ll need to play around with microphone placement a bit to ensure all the sounds you want to stream or record are clear and balanced. But a well-placed microphone will be the single biggest improvement to your audio quality that you can make.
The Blue Yeti microphone simply plugs into your computer via USB. Users can control the gain (input sensitivity) and the pickup pattern (the direction(s) the mic takes in sound) to ensure the best possible sound given the gear and space. If using a practice pad, the cardioid pickup pattern works best since the microphone will only pick up the sounds occurring right in front of it. If using a drum set, the omnidirectional pickup pattern allows the microphone to capture more sound bouncing around the room, resulting in a more accurate sonic picture. While a single well-placed microphone will get the job done, it won’t be possible to separate your voice from the drums or isolate particular sounds.
Using Multiple Microphones
In order to record more than one microphone at a time, you’ll need to pick up an audio interface. An audio interface is a device that behaves as a translator between a microphone and your computer. Essentially, it takes an audio signal (sound) and converts it to a digital format, which your computer can then interpret and reconstruct, converting the signal back to the original sound. But since there are many, many options for microphones and interfaces, we’ll break down a method for tracking a practice pad and your voice, and then a separate method for tracking a full drum set.
Streaming A Practice Pad
Streaming or recording a practice pad and your voice requires 2 microphones. A dynamic microphone (like the Shure SM-57) works best for recording a practice pad, while a simple pair of headphones with a built-in microphone can capture your voice separately. Since the headphones can plug directly into your computer, you’ll only need a single-channel interface to pick up the practice pad. But you’ll also need a mic stand and an XLR cable to hold and hook up the microphone to the interface. Hey, nobody said recording was cheap! From there, you’ll need to route the audio in your computer so it can be detected by other programs (Zoom, OBS, Twitch, etc.). But splitting the audio signal into two outputs, so you can output the sound elsewhere while simultaneously hearing what your microphones detect, requires a bit of finagling.
SM-57
Behringer Single Channel Interface
Audio Routing
Ladiocast is a free app that allows users to split audio signals into separate outputs. For the purposes of online drum lessons or streaming, splitting your output allows your computer to send the audio signal to your streaming platform/virtual meeting service of choice, as well as your headphones. Ladiocast will have two inputs: Input 1 is the microphone on your practice pad, and Input 2 is the microphone attached to your headphones. The main output will group the two inputs together and send them to a location of your choice. In order to monitor the levels of your voice and the practice pad, you’ll need to set both inputs to the computer’s headphone jack (built-in out). If successful, Zoom should detect the input of both microphones and you should also be able to hear everything your microphones pick up.
Streaming a Full Drum Kit
In order to record or stream a full drum set in addition to your voice, you’ll need more microphones (hooray!) and an audio interface with more inputs. At a minimum, you’ll need a 4-channel interface and a set of 4 microphones. To best capture the drum set, rig up the bass drum microphone, a microphone on the snare drum, and a microphone either pointing directly at the hi-hat or above the drums to capture the cymbals (to act as an overhead mic). You’ll use the last microphone as a talk mic. Proper drum miking is a science in itself - do some more research before setting up! We recommend the blog Sound on Sound for an audio recording and mixing reference.
Digital Audio Workstations and Zoom
This is where things become a bit more complex. Mixing the sounds of 4 microphones requires the use of a Digital Audio Workstation (DAW), such as Reaper, Logic, Pro Tools, Ableton, etc. Mac users have access to GarageBand (a free DAW), but older computers may struggle to keep up with this amount of processing. Learning to mix and achieve a solid drum sound takes practice so don’t get discouraged if things don’t sound “good” right away.
Since you’re dealing with multiple inputs, you’ll need to use another program to bus the signals into a single output, which then sends to Ladiocast. Soundflower (for Mac users only, unfortunately) fits the need perfectly. It can bus the audio signal from your DAW into Ladiocast. There are a few necessary steps to correctly route the audio from your mics into your streaming service or video call. Specifically, here’s how to send your drum mix to a Zoom call.
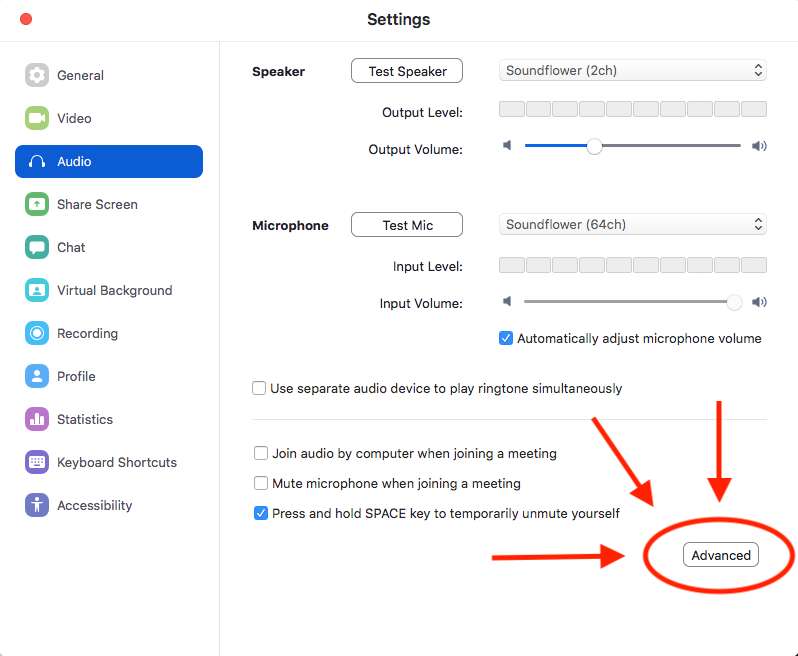
In your DAW (below left - Logic, in this case), select your interface as the input and set the main output to Soundflower 64. In Ladiocast (pictured below center), set Input 1 to Soundflower 64. In Zoom (pictured below right), set the audio input (“Microphone”) to Soundflower 64. Doing so sends the audio signals originating from your interface into Zoom. Set Zoom’s output (“Speaker”) to Soundflower 2. In Ladiocast, set Input 2 to Soundflower 2. Set Main Output to the Built-in Output (your headphones). If done correctly, you should hear your drums, talk mic, and Zoom call altogether in your headphones. If you’re unfamiliar with audio processing and routing, there are many places to make small mistakes along the way so go slowly and try to be patient. It all takes some trial and error!
Streaming E-Drums
Getting acoustic drums into a video call or stream is quite the process, but if you have an electronic drum set, the process is much simpler. Phew!
Using A USB Cable and Headset Mic
Most electronic drum sets can simply hook up to your computer via USB chord. You’ll just need to download and install the driver associated with your drum brain (likely available on the manufacturer’s website) and then your computer will be able to detect the e-drums. If you have a headset with a microphone, in Ladiocast, simply set Input 1 as USB (e-drums) and Input 2 as the headset microphone. Set the main output to Zoom and the Aux out to your headphones. The person on the other end of the call should hear your drums and your voice, and you should be able to hear your drums and voice, too.
Using An Audio Interface
An alternate way to run an electronic drum set into your computer is by connecting the drum brain to an audio interface using an instrument cable (1/4” cable). You’ll also need a separate microphone to use as a talk mic, an XLR cable to plug the microphone into the interface, and an audio interface with at least 2 inputs. This method requires a bit more gear, but the resulting quality in voice tracking makes it completely worth it. If routing audio into a Zoom call, Zoom can detect the audio directly from the interface. In Zoom, set the input as your interface - simple as that! The drums are pre-mixed in the drum computer so there’s no need to involve a DAW aside from monitoring your own sounds and voice. To free up CPU usage, you can use Ladiocast to monitor the two inputs instead of a DAW. Set Input 1 as the drum kit (USB) and Input 2 as the talk mic. Send both inputs to the main output (your headphones).
Zoom Settings
If streaming to Twitch or YouTube is your objective, then you’re pretty much good to go audio-wise. Video is a different story... But if you’re looking to give or take online lessons and want to have high-quality audio on Zoom calls, there are just a couple more steps needed to polish off everything.
To ensure the repetitive sounds of drumming aren’t filtered out as background noise in Zoom calls, there are a couple options that need to be disabled. In the call window, open the audio settings by clicking the small arrow next to the mute button. You can also click the small gear icon on the home screen to open general settings. Click the ‘advanced’ option at the bottom right of the window that opens. Check the box next to ‘Show in-meeting option to Enable Original Sound from microphone.’ Doing so gives users the option to disable any pre-set audio processing in headset microphones. Under ‘Audio Processing,’ disable ‘Suppress Persistent Background Noise’ and ‘Suppress Intermittent Background Noise.’ Now, the drums won’t get detected as background noise and filtered out.
Streaming high-quality live drumming is definitely a tricky process requiring a bit of an investment and some tech knowledge, but the above methods should get you off the ground and moving in the right direction. There are other ways to achieve the same or similar results, but things only get more complex than what’s described here. Getting the hang of the technology is an achievement itself!
To see the above processes in action, get assistance with your routing, and to take your drumming skills to the next level, schedule a trial lesson with one of our instructors!


